Thursday, May 11, 2006

Chemistry of Anodization Part2

This will probably be my last post as my co-op has ended. It was a valuable learning experience and I am sorry that I did not post more but I didn't want to be redundant. I hope this will benefit others in some way. If anyone who visits this site has any questions, feel free to ask.

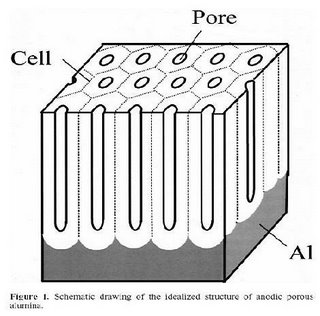
I have found that each anodization is unique which is due to deviations of concentration in solution preparation and temperature. Such can be found in this research paper:
The effect of temperature and concentration on the self-organized pore formation in anodic alumina. M Almasi Kashi and A Ramazani, Institute of Physics Publishing, 38 (2005), 2396-2399.
Reproduced by permission of ESC - The Electrochemical Society
Conditions for fabrication of ideally ordered anodic porous alumina using pre-textured Al.
Hidetaka Asoh, Kazuyuki Nishio, Masashi Nakao, Toshiaki Tamamura, Hideki MasudaJournal of The Electrochemical Society, Vol148 (4), B152-B156, 2001

Though I can't say that all of my anodizations went perfect....
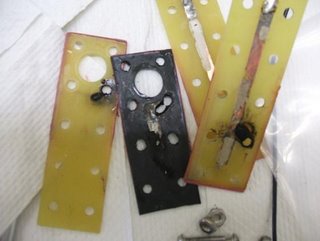
Unfortunately this happened due to the anode stirp comming in contact with the stainless steel screw. I am not sure how long it went on but the high current was enough to burn through the fiberglass circuit board.

Happy Anodizing!

Friday, May 05, 2006

CVD

I guess this is a good time to discuss a little about what happens after I make these alumina membranes. I can not get too specific about the research that anyone else is doing so I am just going to give information as to what has been done in the past with CVD, carbon nanotubes, and alumina membranes. As far as the synthesis of the CNT goes this is the end of the journey.

Chemical Vapor Deposition
The idea is simple - make the carbon nanotubes in the nanopores that we got with the alumina membrane.
The task is difficult. How can one get carbon into tubes and tunnels all the way through? The easiest way is to let the carbon do the work by moving through an atmosphere at a slightly elevated pressure. That sounds good but what about the carbon? We could by it in powder form and blow it through but that could clog up any tiny instruments used not too mention you can see the carbon with your naked eye and we need it in nano sized clumps.
The solution - heat a gas of hydrocarbons around the alumina membranes until it naturally breaks down and deposits onto the membrane. This is how in general, the CVD procedure works.
After inserting your alumina membrane samples into a furnace (usually in some kind of glass or quarts tube) you eliminate all of the air in the tube by blowing a heavy gas (in my case Argon) so when the carbon is released it doesn't react with the atmosphere and oxidize. While you are blowing Ar through the tube, the furnace is heating up so when you switch to the hydrocarbon gas it immediately meets the high temperature and breaks down. You also do not want a lot of carbon. The goal is to make "tubes" meaning there is some finite diameter that the carbon must leave open so we can do experiments. A mixture of hydrocarbons and a lighter gas that won't decompose or deposit onto the membranes is sufficient. The process takes around 6 hours not to mention the heating up and cooling down time for the furnace.

The Purification
We now have our glossy carbon coated membranes with carbon deposited into the nanotubes. Now to get the nanotubes out.... OH NO! I forgot my nano-sized tweezers in my other pants. Well it isn't any near that tedious. To remove all the unused membrane from around our nice CNT, we simply have to break them up in basic solution that will dissolve the membranes. This also requires some heat for about 3-4hours. Once time is up, just filter and neutralize the nanotubes, and you are set. Well until you need to anneal them that is....
Pictures

Tuesday, April 11, 2006

First Experiment Explaination and Disscussion

This is my first anodization and the target pore size on the alumina membrane was 40-60nm.I used Aluminum foil that was 0.25mm and 99.99% pure that was previously electro-polished by my supervisor Gulya Korneva. A piece was cut out and attached to an anode and a stainless steel plate was used for the cathode.

The electrolyte chosen to use was a sulfuric acid solution. We decided to do two different concentrations of sulfuric acid, 0.5M and 20%, and each at a different voltage. There was some difficulty getting the voltage to my desired value in the 0.5M because the current can not go to high or else it will damage the surface of the membrane. Unfortunately the current did rise to over 1A and the power generator was immediately shut off and voltage switch lowered. The voltage was turned back on and reached 27.2V with a stable current of 0.023. Any higher and the current immediately jumped but it only crossed 1A once. The voltage chosen for the 20% solution was reached well enough because we chose a lower voltage. The temperature was 1 degree Celsius for both solutions.

Once time had expired I took the samples out of solution and rinsed with DI water.

I proceeded to remove the un-anodized portion of the aluminum sample by putting it in Cupric chloride. Once the Al had been eaten away I rinsed the sample with DI water and then put it in a 0.1M phosphoric acid solution and heated to about 45C and left it in the solution for 30 minutes. After, I soaked it in acetone to get the nail polish off. Rinsed with DI water and I had my final sample.


This is an SEM picture of my sample alumina membrane that was done in 0.5M sulfuric acid and unfortunately broke. You can see these dots on the surface that is due to a high current. There are no pictures for the 2 hour 20% sulfuric because no sufficient membrane was made with the desired voltage and time limit.


In closer inspection, you can see just what happens when the current is increased too much.


These are the nanopores that where produced from the anodization. They are between 14 and 20 nm in diameter.

Discussion: This was a good learning process. I have done the electro-polishing and it seems there are some issues concerning that which I will discuss at a later date. There are many factors that can affect the outcome of the membrane. The biggest contributors are the voltage, and temperature. Since this anodization I have done several others. Unfortunately time does not permit me to take SEM pictures of all of my membranes.

Monday, April 10, 2006

Chemistry of Anodization

The first thing I want to do is talk about the chemistry of anodization as I have gathered from research papers and talking to individuals who have spent a great deal of time working on alumina membranes.

General Information
1) The first thing to understand is that it has been determined through many experiments that Aluminum is an easy cheap and reliable way of making nanoporous membranes.
2) The second thing to understand is that the electrolyte used has virtually little to do with the anodization process. You will find that a lot of acids have been used and a few are favored for the results that are given but you can use just about any electrolyte. This of course excludes electrolytes that will corrode just about anything.

The Chemistry of Anodization
Now what I have gathered is that through the potential difference that is applied between the anode (Al foil usually only 0.25mm and always 99.99% pure) and the cathode (anything but I have been using a stainless steel plate) the 3 valence electrons on the Al metal are attracted so much by the positive anode that Al(III) forms and starts to drift off toward the negative cathode. These positive ions are immediately intercepted by O(-2) ions and even OH ions. By immediately I mean some nanometers off of the remaining Al metal.
Oxide layer: This is how the oxide layer starts to form but what ends up happening is that as one layer forms another layer forms on top of that. And then another and then another. Due to the properties of the electrolyte, the amount of voltage and the amount of current (which should be kept to no more than 0.5-1A otherwise the surface of the Al will be deformed) the oxide layer created straight pores (channels) that are nanometers wide. The uniformity of these pores are always in question and is difficult to control however not impossible. The pores that are formed are round/oval and have a concave end where the oxide layer meets the aluminum layer and for every one there are six other pores surrounding it giving a hexagonal symmetry. Now one of the questions I am still trying to understand is why these pores form a concave end instead of being flat and the surface of the aluminum and also exactly why these pores form at all.

Reprinted with permission from: Self organized formation of hexagonal pore arrays in anodic alumina. O. Jessensky, F. Muller, U. Gosele., Applied Physics Letters, Vol 72 (10), 1173-1175, 1998

Copyright 1998, American Institute of Physics.


Reaction Equations:
[1] Al=Al(III) + 3e
[2] 2Al(III) + 3H2O = Al2O3 + 6H(+)
[3] 2Al + 3O(-2) = Al2O3 +6e
1) Reaction 1 is due to the electric potential that is applied between the anode and cathode.
2) Reactions 2 & 3 describe the growth of the oxide layer.

References:
Self organized formation of hexagonal pore arrays in anodic alumina.
O. Jessensky, F. Muller, U. Gosele., Applied Physics Letters, Vol 72 (10), 1173-1175, 1998

Conditions for fabrication of ideally ordered anodic porous alumina using pre-textured Al. Hidetaka Asoh, Kazuyuki Nishio, Masashi Nakao, Toshiaki Tamamura, Hideki Masuda., Journal of The Electrochemical Society, Vol148 (4), B152-B156, 2001

Thursday, April 06, 2006

Hi

Posts will start as soon as I have gathered enough information to give a complete and accurate description of what I have done. In the mean time, please look at another project I am involved in Malaria.